Wednesday, 19 December 2012

Teacher gifts: first time jitters

This is the first Christmas that we've had a child in full time school and the dilema of what to offer as a seasonal gift that was likely to be appreciated but also simple and appropriate hit us for the first time. Blog-land provided the answer though. There are so many amazing posts out there with ideas and suggestions, and suitably inspired we got to work.

One afternoon of baking with the kids resulted in a nice big batch of gingerbread stars and trees (and several unidentifiable shapes), some for us and some for gifts. Actually, the ones that I made we decided to use for gifts and the kids creations we thought might be better suited for our own consumption. We all had fun making them though.

After letting the kids ice theirs I decided that the ones to be given as gifts might need adult-only attention, so last night once the kids were asleep I got busy with a bit of white icing. Keeping it simple seemed to be the way forward, not least because Midi has two teachers and a teaching assistant so there were quite a few biscuits to get through.

The final question was one of presentation. One of the homewares shops in my local town came up trumps with some fantastic flp-lid jars which were not only reasonably price but had red lids too! How much more seasonal can you get?

 
Add a bit of ribbon and a gift tag and they're good to go! Midi was most excited going into school with her first two to give away this morning. Seasonal teacher gifts sorted! (And another new parental challenge completed.)


Monday, 10 December 2012

The sticky jewellery organiser - a tutorial

It's been a while, hasn't it? It's been a mad year, what with a sick father, a new toddler and a new business. I'm going to forgive myself for not being here more often. I'm also not going to commit myself to being here more often again, but I'm glad I kept this place, because today I finally got round to a craft project I've been wanting to take on for a while and I'd also like to share it.

Here is the twiggy necklace organiser, or the rustic jewellery display shelf, or, well, I don't really have a name for it but here it is:


We've needed something to help organise our jewellery for a while and I've seen things similar to this online so when we had to give our big hazel a trim last month I kept a branch or two aside with this in mind.

Here's the how to:

 
Collect your sticks! You need a larger piece for the base (mine was about 1.5" thick and 18" long) and a selection of smaller twigs that will become the hooks.

 
Take a good look at your smaller twigs. Ideally they will all be a similar width. You'll need to have access to a drill bit suitable for wood that is almost exactly the same size as them. If you can't find a precise match then go for one that is ever so slightly smaller. Too big and your twigs will just fall right out the holes (unless you use a ton of wood glue).

 
Drill holes at a slight angle at intervals all along your base stick. You need the same number of holes as you have twigs, surprisingly enough. Each hole should go about half an inch deep into your base stick.
 
At each end of your stick you need to drill the holes that you will use to secure your hanging rail to the wall when it's finished. These need to be drilled stright through the base stick, not at an angle, and they need to go all the way through. (I forgot to photograph them, but you basically need one hole at each end, about 1" in.)

 
Once all your holes have been drilled, push the twigs into all of them apart from the ones for hanging at each end. They should be quite a snug fit. If they are loose, you might need to use some wood glue to secure them. If any of your twigs are too large to fit in the holes then you can whittle a little off the end to make them fit.

 
Once all your holes are filled with twigs, and glued should you feel the need, you're all done!
 
 
To hang (again, I didn't photograph this part) simply screw a screw through each of the holes you left at the ends until they protrude slightly out the back of the stick. Press the completed hanger against the wall, hard enough that the screw tips leave slight indentations in the wall. Use these as guides to drill into the wall using whatever drill bit is appropriate for your wall type and insert the right kind of plugs before screwing the hanging screws into the wall. If you're hanging it directly onto wood you can just screw straight into it.
 
 
And there you have it. One jewellery hanger that looks great, is completely free and took less than an hour to create.

Monday, 29 August 2011

Yellow Angry Bird Crochet Pattern

As the first leaves start to turn I find the first thought that springs to mind is that it's my daughter's birthday soon. I always like to make her a gift and this year I happened to ask her what she wanted whilst she was playing on my phone. "I want the angry birds Mummy." I could have guessed my timing would result in a request like that but I was quite happy to be set this particular challenge. I've become quite a fan of the game myself.

I'm looking forward to making the full set, and a few pigs, and can just picture the fun that will be had recreating the game with these soft squishy toys and a large collection of building blocks.

So, here is bird number one, the triangular yellow one. I wrote out the pattern as I went so here it is for anyone else who fancies creating one. I'm not the most experienced pattern writer so please let me know if you try it and it needs tweaking at all, or if anything doesn't make sense. Despite being British I learnt my crochet from the internet so speak American so this pattern uses American stitch names.

Enjoy!

Yellow Angry Bird Crochet Pattern

Body Top

Make 1

Using yellow DK yarn and D/3.25mm hook:

Ch 2
Row 1: 6sc in 2nd ch from hook. (6 stitches)
Work in a spiral from this point, You may wish to use a stitch marker to show where each row starts and finishes.
Row 2: *1sc in first stitch, 2sc in next stitch* repeat twice (9 stitches)
Row 3: *1sc in next 2 stitches, 2sc in next stitch* repeat twice (12 stitches)
Row 4: *1sc in next 3 stitches, 2sc in next stitch* repeat twice (15 stitches)
Row 5: *1sc in next 4 stitches, 2sc in next stitch* repeat twice (18 stitches)
Row 6: *1sc in next 5 stitches, 2sc in next stitch* repeat twice (21 stitches)
Row 7: *1sc in next 6 stitches, 2sc in next stitch* repeat twice (24 stitches)
Row 8: *1sc in next 7 stitches, 2sc in next stitch* repeat twice (27 stitches)
Row 9: *1sc in next 8 stitches, 2sc in next stitch* repeat twice (30 stitches)
Row 10: *1sc in next 9 stitches, 2sc in next stitch* repeat twice (33 stitches)
Row 11: *1sc in next 10 stitches, 2sc in next stitch* repeat twice (36 stitches)
Row 12: *1sc in next 11 stitches, 2sc in next stitch* repeat twice (39 stitches)
Row 13: *1sc in next 12 stitches, 2sc in next stitch* repeat twice (42 stitches)
Row 14: *1sc in next 13 stitches, 2sc in next stitch* repeat twice (45 stitches)
Row 15: *1sc in next 14 stitches, 2sc in next stitch* repeat twice (48 stitches)
Row 16: *1sc in next 15 stitches, 2sc in next stitch* repeat twice (51 stitches)
Row 17: *1sc in next 16 stitches, 2sc in next stitch* repeat twice (54 stitches)

Body Base

Make 1

Using white DK yarn and D/3.25mm hook:

Ch 2
Row 1: 6sc in 2nd ch from hook. (6 stitches)
Work in a spiral from this point, You may wish to use a stitch marker to show where each row starts and finishes.
Row 2: *3sc in first st, 1sc in next st* repeat twice (12 stitches)
Row 3: *3sc in first st, 1sc in next 3 st* repeat twice (18 stitches)
Row 4: *3sc in first st, 1sc in next 5 st* repeat twice (24 stitches)
Row 5: *3sc in first st, 1sc in next 7 st* repeat twice (30 stitches)
Row 6: *3sc in first st, 1sc in next 9 st* repeat twice (36 stitches)
Row 7: *3sc in first st, 1sc in next 11 st* repeat twice (42 stitches)
Row 8: *3sc in first st, 1sc in next 13 st* repeat twice (48 stitches)
Row 9: *3sc in first st, 1sc in next 15 st* repeat twice (54 stitches)

Eyes

Make 2.

Using white DK yarn and D/3.25mm hook:

Ch 2
Row 1: 6sc in 2nd ch from hook. (6 stitches)
Work in a spiral from this point, You may wish to use a stitch marker to show where each row starts and finishes.
Row 2: 2sc in each stitch round (12 stitches)
Change to black DK yarn
Row 3: *slip stitch in first stitch, 2 slip stitches in next stitch* repeat 5 times.
Tie off leaving a 10” tail.

Eyebrows

Make 2

Using brown DK yarn and D/3.25mm hook:

Ch 9, turn
Row 1: Sc into 2nd chain from hook and in each ch in row.
Tie off leaving a 10” tail

Tail/Head ruff

Make 2

Using black DK yarn and D/3.25mm hook:

Ch 8, turn
Dc, hdc, sc in 3rd ch from hook. Slip st in next 2 ch.
*Ch 4, dc, hdc, sc in 3rd ch from hook. Slip st in next stitch. Slip st in in next stitch on original chain.*
Repeat 2 more times.
Tie off leaving a 10” tail.

Beak

Make 1

Using orange DK yarn and D/3.25mm hook:

Ch 2
Row 1: 6sc in 2nd ch from hook. (6 st)
Work in a spiral from this point, You may wish to use a stitch marker to show where each row starts and finishes.
Row 2: 2sc in first stitch, 1 sc in each of the next 5 stitches (7 st)
Row 3: 1sc in each st (7 st)
Row 4: 1sc in first 3 st, 2sc in next st, 3sc in next 3 st (8 st)
Row 5: 1sc in each st (8 st)
Row 6: 2sc in first st, 1sc in next 3 st*, repeat (10 st)
Row 7: 2sc in first st, 1sc in next 4 st*, repeat (12 st)
Row 8: 2sc in first st, 1sc in next 5 st*, repeat (14 st)
Tie off leaving a 10” tail

Assembly

I attached the features to the body top before stuffing because I find it easier and because I was using plastic eyes as pupils but this isn't essential and black stitching would also work for the pupils.  I used started toy stuffing but again, anything would work. Whatever you use, stuff your bird quite firmly - it helps it to keep its shape.

Attach the eyes first, securing in the centre with a pupil of your choice and then stitching round the outside, trimming all other loose threads and stuffing them under the eye to keep them out the way. Then stuff the beak and stitch on, and sew the eyebrows into position. The head ruff and tail can then be positioned. 

Line up the triangular shaped base and stitch 2/3 the way round before stuffing firmly and sewing up the opening. And then, if these instructions have been in any way usable, you should hopefully have your very own yellow angry bird!

Saturday, 20 August 2011

Balls. (Alternatively: What I Did on My Holidays)

Well, it's been a good while since I last posted. I clearly wasn't quite as blog addicted as I thought given it only took a week in a caravan in Wales to get me out of the habit. I've still been thinking of it though, crafting away and photographing as I went for future posting.

So without further waffling, here is the latest creation:


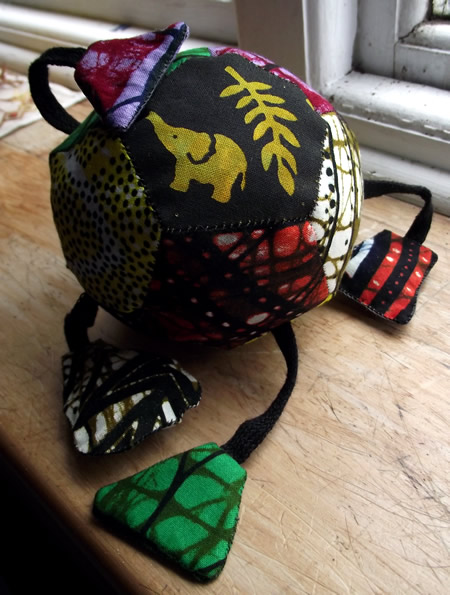
In my last (now two month old) post I announced my intention to participate in Stashtacular. It was a marvellous idea and I did indeed manage not to buy any fabric for a month, and I received some lovely fabric back in return for the bundle I sent off. I didn't actually make anything from the tutorials that the event organisers created for it. Several tickled my fancy, but it was a very busy month and I just didn't have time. One thing that stuck with me though was Jenna's fabulous hexy mug rug tutorial using the paper piecing quilting technique. I've never quilted before, not properly anyway, so even the idea of a mug rug is a little daunting. I figured you could modify the technique using pentagons to make a ball - or more accurately a dodecahedron - which satisfied both my desire to give the technique a try and my inner maths geek.

I used African print fabric that I picked up at the World Textile Day event back in March and as this is intended to be a gift for a friend's baby, I added some dangly bits. The toys that a younger Mini most enjoyed were those with cords or loops that were easy to grab and thanks to knots or bumpy bits, also harder to lose grip of. I hunted around my supplies and managed to make one that jingles, one that rattles, one that squeaks and two that crinkle. Hopefully the baby it is intended for will get some pleasure out of them!


One of the things I surprised myself by really enjoying was the fine detailed work. The whole thing is hand sewn and there's a lot of satisfaction in that for me.

There's more, but I have a baby stirring so will have to return later. The joys of my adventures with red corduroy are still to come.

Monday, 13 June 2011

Stashtacular - oh yes please!

I've been following Jenna's blog, Sew Happy Geek for a little while now and when she posted earlier today about Stashtacular, a month long event she and some fellow bloggers are hosting I was immediately sucked in. The idea of not buying new fabric for a month is appealing in itself - I've got plenty to work my way through without resorting to buying more - a whole chest full in fact. But the chance to send off a bundle of fabric from my stash to be given out to other crafters and to receive a random collection of new fabric back in return really gets me excited.


I've already gone through some of my stash to build a collection to send off. I have several piles still to sort through though, so it's likely to get bigger. I am very much looking forward to this!

Thursday, 9 June 2011

Bandana Bib Tutorial

I've been getting quite behind with posting this last week. Firstly it was half term so there was no play group for Midi and my folks who would normally take her for a day or two are dealing with a lot themselves right now, so I had her all to myself all week - as well as Mini. We had a lot of fun, but other things like my crafting and blogging had to take a back seat. Then there was also the minor issue of my Dad's exhibition (he's a glass sculptor). It had been planned for some time but due to his ill-health he's not able to do it all himself right now so my sister and I took on some of the setting up. That was fun too, but had the same effect on my 'me' time.

Anyway, I'm rambling. In the midst of all this Mini has entered into that wonderfully soggy, dribbly stage of pre-teething. We've got a huge stash of regular bibs left over from Midi's younger years but they seem huge and not at all flattering, and I was quickly getting tired of changing Mini's top multiple times a day. I've been seeing bandana style bibs around for a while and thought they'd be perfect, so had a bash at making a few. Here's how the latest one turned out:


I went through a few design tweaks to get to that particular one. It resulted in several perfectly useable bibs but the one above is the end product. There will be plenty more made to this pattern over the coming weeks I'm sure!

I used an old t-shirt, some thin flannel, a few pieces of velcro and a bit of fabric paint for the stencil robot on the final one. That is all. These aren't hard. Here's how I went about it:


I cut two squares, one out of an old t-shirt and the other out of flannel. This was to make two bibs. The sides of each square are approx 13" long and this was to fit a slightly large four month old baby. Probably 3-6 month size or thereabouts.


I placed the two squares on top of each other, neatly aligned, and folded them into quarters along the diagonal.

 I then cut a slightly curved line along the edge of the first fold. This cut resulted in four almost triangular piece, two out of each type of fabric:


I then placed two of the pieces together and stitched around the edge of them leaving a small gap for turning them right side out afterwards. There isn't really a right or wrong side with the fabrics I used but if you try this and there is with yours then make sure they're right sides together when you sew.


I turned them right side out and then top stitched all the way round 3/8" from the edge to close the hole. Sorry, I forgot to photograph this bit. Adding a bit of velcro to the top two corners (one on the inside, the other on the outside so that they neatly meet) finished them off:


And in use:

However, I wasn't entirely happy with them. The triangular tips made it a little fiddly to attach the velcro and the pieces had to be quite small so when the bib was worn there wasn't a great amount of contact between the two pieces. Although it wears fine I'm sure that Mini could easily yank it off if he was of a mind to which kind of defeats the object of wearing one in the first place. So I tried again, tweaking the design a bit.


This time I just cut one piece from each fabric. To give you an idea of size in case you wanted to give this a go the two straight edges are 13" then all I did was flatten off the corners before cutting the gentle curve to go round the neck. Before sewing I used the bin bag/freezer paper technique to stencil on a little robot design to add cuteness value, then followed the same steps as above. The big benefit of the new pattern was that I could use one of the velcro ends as the opening/turning hole which gave a neater finish. That'll be the way to do it then!


And before I sign off for now, a little teaser for what I'll be writing up shortly. Last week, while doing a mad dash round the shops to get wine and plastic beakers for Dad's exhibition opening I spotted this pack of three rather funky coordinating tea towels at the bank-breaking cost of £4:


I grabbed them not knowing exactly what I would do with them but certain that they had great potential. I very quickly decided a new summer dress for Midi was where they were headed, but then I wished I'd picked up two packs because I couldn't quite see how to make a dress to fit a 3-4 year old with matching front and back. It was then that I realised I'd just set myself a challenge. With no opportunity to go back to the shop but the chance to spend an evening sewing I had to figure out a solution. And here it is:


I'm rather proud of this one - my own design no less. A tutorial for this rather funky little 'three tea towel dress' is in the making so watch this space!

Friday, 3 June 2011

Taggie toy free pattern

A couple of weeks ago I posted about the taggie toy I'd made for Mini. It's received quite a bit of positive feedback both online and in real life - so much so I've had requests from friends to make them for their babies. In response, I've knocked out a quick pattern for it for my own reference and once I'd done that I realised it would only be a little bit more work on my part to add some instructions and make it into a little downloadable.

So if there's a baby in your life that you think might appreciate one of these little monkeys then you can download the pattern and basic instructions below. The instructions are very basic. There is no tutorial, just a quick write-up so basic sewing skills would be handy. I may add a tutorial in the future if I get enough requests but it really isn't that hard.

And of course the little fellow can be modified in any way you wish. Change the fabrics (I used fleece for the body and felt for the features but old t-shirts, muslin or cotton prints would all work), add or reduce the number of tags, or what they're made of (I used shoelaces but any kind of ribbon/tape would do), play about with the features... the possibilities are endless! If you do make your own taggie toy from this pattern, or even loosely based on it then I'd love to hear about it!

Monday, 30 May 2011

A bit of brightness for the long weekend

It's been a strange weekend here - one of those with several stresses but lots of highs to lighten the load. The biggest high was my Dad making it back into the UK in one piece. He's still got lots of recovering to do and there's a high likelihood there'll be some surgery in his near future, but he's here so I can do my bit in keeping an eye on him again. And sit on him when he tries to do too much.

Another big high for me was an email that was waiting for me this morning from Sascha at Piccoli Piselli. I won the amazing Pea Pod carrier she was giving away for the Sew Mama Sew Giveaway day! Lookie Look:


Isn't it just gorgeous? I'm so thrilled. I became a follower of her blog when I found it through the SMS event and some of the stuff she makes is really wonderful. I'm over the moon to have won this. It looks like a great design and is worn on the left hip which will make a wonderful partner in crime to the front/back worn ergo that we currently use most. I'll be able to make myself a cup of tea without having to reach around a slung Mini. And helicopters! We get them flying over here almost daily so even that is perfect.

Thank you Sascha. You've made my day. :)

And a big thank you to Ana over at Stash Avalanche too. I didn't win any of her official giveaway prizes - she's so generous she gave away four - but she liked the really bad joke of Midi's so much that she's sending us a special prize. We are so lucky! Two prizes! I knew I liked the idea of that giveaway day...

We've been having colourful fun here too. Midi has discovered the joys of nail varnish:


We've had some great fun making magic potions (thanks to Toni over at Unconventional Us for the idea):


And I got a few minutes at the sewing machine to knock out some funky tartan trousers for Mini. They're a touch big but at the rate he's growing that's no bad thing. I love them!

Sunday, 29 May 2011

Bags and badges

It's been a crazy week really. Lots of family stuff has dominated so the crafting has had to take a bit of a back seat. Things will hopefully be more settled from this point onwards though I may be down on childcare so although I hope to be able to get back onto the crafty wagon with more gusto soon I may be a bit more limited for a while.

Still, I've managed to get a few things done. It's a time of birthdays round here so present making has been a priority. Midi was invited to the 4th birthday party of a friend this week and I wanted to make sure she gave a gift that was unique and personal. I spotted this great tutorial by Zaaberry recently and thought it would make a great basis for a present. I was lacking in vinyl so I decided to use some coated fabric that I've had lying round for a while - at least it's wipe-down-able. I also decided to custom decorate the fabric for the top panels so the wax crayons came out again (spot the addict) and I made one for Midi as well. She chose the colours for her friend's fabric as well as a selection of toy cars and marbles to go into the bag before it was wrapped and presented at the party. All in, I think we created a pretty nice gift.


I probably shouldn't post details of this next gift given that the birthday in question hasn't happened yet and the recipient may spot these photos before he receives it - it needs to be posted to the other side of the planet yet. But I'm really pleased with it, I'm rubbish at keeping things like this secret and I'm sure he won't mind too much if the surprise is spoiled. My cousin's son in Australia is about to turn 18. I've no idea where the handsome young man he now is has sprung from - I was taking him to kindergarten just five minutes ago - but these things just seem to happen. Hopefully he'll appreciate the collaborative creative efforts that Midi and I put into making his gift.


It's winter in Australia right now so I decided long sleeved tops might be more useful. For the first top, Midi was set loose on some fabric scraps with fabric pens and I attacked another with wax crayons (definitely an addict). We then roughly stitched them onto one of the tops in random places specified by Midi. 

The K (his initial) is on the end of one sleeve and the white patch does actually have yellow spots on it but they don't come out very clearly in this pic:


These two beautiful figures are Shrek (on the right) and Fiona:


And this is a portrait of the birthday boy himself:


The second shirt is a monster shirt with features placed by Midi and stitched on by me:


What self-respecting eighteen year old wouldn't want to wear clothing designed by a three year old? A perfect gift if you ask me - within this family at least.

Wednesday, 25 May 2011

And the winner is...

Wow! I have so enjoyed taking part in the May Giveaway event. I've had such lovely comments and I've entered several fantastic giveaways too. If I'm lucky I might win something but even if I don't I still get to give someone else that lovely warm feeling of winning something, and that feels great.

So without further ado I'm pleased to announce that the winner, selected at random by the number generator over at random.org is... Amy from Salamander Dreams! I'll drop you an email shortly Amy so I can get this little bag winging it's way off to you. And a huge thank you to everyone who took the time to comment and take part. I've really enjoyed checking in intermittently to see who has commented, and from where. That's the other really cool thing about this event. I've found so many other great blogs and my follow list has grown considerably. I may not have much time for crafting now as I'm going to be reading what all these other fascinating people are up to! :)

And thanks so much for all the good wishes for my Dad. I've really appreciated them and I'm sure some mystical way he has felt them too. It's been a worrying few days but as of yesterday he seems to be responding to treatment and beginning the long, slow road to recovery. With luck we'll have him back in the country next week. Thank you.

Sunday, 22 May 2011

May Giveaway Day!

About a week ago I stumbled across the Sew, Mama, Sew May Giveaway Day concept and I thought it was a fantastic idea. I haven't done a giveaway before but after doing a bit more wax crayon batik experimentation last week I ended up with a cute little bag, just right for a creative kid to use to carry pens and paper around (Midi has several bags like this for moments artistic inspiration when on the move). It seemed a perfect item to choose.

So here it is, a gift from me to a reader selected at random from those that comment here before I first log on on Wednesday May 25th. I'll ship internationally if needs be.

The image was created by using melted wax crayons as a resist and then using acrylic paint as a colour wash - this bag is probably therefore wipe clean only. Sorry about that! If you're interested, you can see the steps I went through to create it in this post from last week.

The bag itself is fully lined and is made out of a recycled pair of jeans so it's good and hard-wearing. It looks almost black in this picture but it's actually a dark blue denim.

I'm posting this a day early because I can't be sure I'll get much computer time over the next few days. It seems my Dad has managed to get himself admitted to hospital whilst on holiday in Menorca so I expect to be mistress of the international telephone lines for a few days until I get a better idea of what's going on and what assistance might be needed. I've been assured it's 'nothing to worry about' by my Mum who is with him, and I was reassured when after a few texts back and forth about Dad's health I was tasked with reporting the football scores to them. But still, I'm a little out of sorts and expect to be somewhat distracted and extra busy for a few days. I still hope to get a few moments to visit a few of the other giveaways though...

************* This giveaway is now closed. Thanks for taking part! *************

Friday, 20 May 2011

Faces and flappy bits

Mini has just reached the stage where he's found his hands and when they're not in his mouth (teething alert) he's studying them with interest. You can almost see the cogs turning as he figures out that he can make them Do Stuff. It's fabulous to watch and we're now at the point where anything within reach could quite easily find its way into his mouth.

Ages ago I started working on a plushie taggie for him. I never quite got round to finishing it but finally tonight was the night. I wanted to give it a face because, well, faces are good and engaging and Mini seems to feel the urge to grin whenever he sees one regardless of whether it belongs to a human being or not. I spotted some funky shoe laces a little while back that I knew would make great tags. Put them together and this is what we got:


Once it was almost done I decided not to stuff it after all. I liked its floppy flappiness and it seems someone else does too:

Thursday, 19 May 2011

Lunch to go

Just over six months ago I realised one evening that because Midi was going to be attending her first full day at play group the next day she was going to need a packed lunch. One rushed trip to the supermarket later and she was the proud owner of their budget make of lunch bag, with her name written across the top in marker pen. Very classy. She was quite happy with it though. It meant she was going to have a packed lunch and that was extremely exciting in and of itself.

I've been meaning to make her a better bag ever since but just haven't got round to it. I had managed to get in a few things, such as a pound shop raincoat to use as the lining and I'd already decided to use the existing bag as a template given Midi was familiar with it and I knew it was the right size.

Today I noticed that the lining had started to tear in her budget bag so the issue was forced and tonight both kids were in bed asleep by 7:30pm so the opportunity was there. Midi requested a bag with a fairy, butterflies and hearts on it, so I had another play with the wax crayon batik technique on the hob. I'm not so excited about this one - I have to admit the subject matter didn't really get my creative juices flowing, but hopefully Midi will like it.

It's a packed lunch day tomorrow so we'll soon find out!

Wednesday, 18 May 2011

Hot plate crayon batik

Well, after a weekend away with family it seems only right to jump back in with a bit of a splash. We've had a very busy day! After a morning of meetings and a visit to my folks, with both kids, we landed home for lunch and got busy. I'm still so excited about the wax crayon batik technique I tried recently and have been wanting to explore it a bit more. After making cakes and sock puppets with Midi I managed to grab a few minutes to try something new.

The first time I tried it I put wax crayons into a cake tin and popped them in and out of the oven to keep them melted enough to paint with. It was fun but a little fiddly. I couldn't help but wonder if it would be possible to use the same technique employed to get the wax out of the fabric to put it in, or something like it anyway. I think it worked:


With both kids about I didn't really have the option of going back and forth to a hot oven and having melted wax sitting about ready to be prodded/spilt/eaten. So drew out a basic design on a small scrap of white cotton and placed it on a foil covered baking tray directly over a hot plate on the hob:


 I then coloured in the image with wax crayons, holding the tray still with an oven-mit with my other hand. The heat from the hot plate melted the wax on contact. This allowed a much finer layer of wax to be applied than with the painted on technique, but it was a little awkward. It was hard to get neat edges because the crayon was constantly changing shape as it melted into the fabric. Apart from that it seemed to work quite well and I'm sure it could be refined with practice. Neatness is not one of my virtues anyway.


Once coloured, I popped it in the fridge for a couple of minutes so the wax could really harden. Given it was a much finer wax coating I wasn't sure how well the cracking aspect would work so I wanted to give it all the help I could. As it happened, it didn't crack well. There was no satisfying crunch when I scrunched it up so I wasn't filled with confidence but then, this was an experiment. Time would tell.


I then painted on some blue acrylic paint. This time I didn't fill in the whole image in wax so I needed to use a relevant background colour instead of just a high contrast colour. I probably could have gone darker but I got hijacked by small child before I could do another coat so decided to just see how it worked as was.

Once it dried I hit the iron. This was one big plus of doing it this way - the ironing took a fraction of the time and the wax was out. I'd decided to use the piece as a patch so when I ironed it I also ironed the edges in ready for sewing.


It wasn't looking too magical, but a quick once over with a black fabric pen and the wonder of the technique revealed itself:


So, the cracking was much more subtle and the contrast wasn't as extreme with the blue rather than a black bleed, but this approach still gives some lovely colour variation. I'm really quite pleased with how it turned out.

Midi was by now getting peckish so I made her some tea and once Mini had been fed and changed and was in his 'happy to watch, grin and gurgle' mode I jumped on to the sewing machine. I still had half a pair of old jeans left from when we made bean bags last week so cut it up and knocked out a quick bag to go with the patch. I thought the denim would be a good match for the blue image.


I'm quite pleased with it. I recently read about Sew, Mama, Sew's May Giveaway Day and thought it was an amazing idea. I liked the idea of taking part but couldn't think what to offer - until now. I think this may be it, so if you fancy it, pop back on Monday to sign up for a chance to get it winging its way to you.

So that was our busy day! I will now head to bed with happy memories of today's chocolate cakes:


Sock puppet shenanigans:


And the fun and frolicks that can be had with snatched moments and wax crayons. Night all!
Related Posts Plugin for WordPress, Blogger...